Category Archives: Preserves

Hot Tropic Jam

Fruit, juicy…..how about a nice tropical punch? Sheesh, did that commercial really make anyone want to buy Hawaiian Punch?  I have to admit, I did like artificially flavored and colored sugar water when I was a kid, but now I know it was a poor imitation of the real thing, which is a refreshing beverage made by steeping dried hibiscus flowers and sweetening the resulting “juice” to taste (this is known in Mexico as agua de jamáica).  A tall iced glass is so good on a warm day, and the fruity flavor, floral aroma, and vivid red color will no doubt let you imagine yourself on a sunny beach with a tropical breeze blowing through your hair.  I made the agua not long ago and thought, why not try to capture that taste in a jar?  I tossed in fresh ginger and scotch bonnet peppers for some tropical heat, cooked it into a jam, and ¡caramba!  The result is sweet, tart, spicy, and delicious.  I can think of so many uses for this jam: plop it over a brie round, cover with puff pastry and bake, or spread it over a block of cream cheese and dig in with your favorite crackers, or mix some of it up with a little soy sauce and use it to glaze baked or barbecued chicken.  What the heck, eat it with a spoon!

jam and cream cheese

The recipe includes a few specialty ingredients, but they shouldn’t be too hard to find, and if they are, I have some suggestions for substitutions. You’ll need the dried hibiscus flowers, which are often found in the Hispanic foods section of large supermarkets (and you are certain to find them in a little Mexican store if you have one in your vicinity – ask for flor de jamáica), some fresh ginger, a few hot peppers (habanero, scotch bonnet, or something along those lines), guavas (I used canned), and the clincher is Pomona’s Universal Pectin (I ordered it from Amazon).

If you can’t find the hibiscus flowers, brew some strong hibiscus tea (I would say 12 teabags for two cups of boiling water) and top off the rest of the liquid needed with pomegranate juice.  If guavas are not available, swap in chopped pineapple or another fruit.  Don’t substitute another kind of pectin, though, because the Pomona’s will let you sweeten your jam to taste (plus the ratio of pectin to other ingredients in the recipe is based on Pomona’s but would just be a guess with another type of pectin).  And speaking of sweetening to taste, let your own preference be your guide in spicing as well.

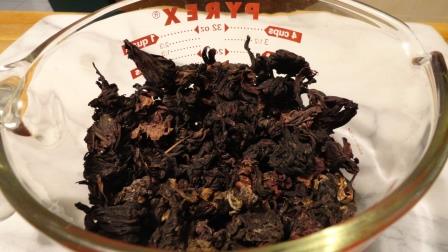
flor de jamaica

scotch bonnets

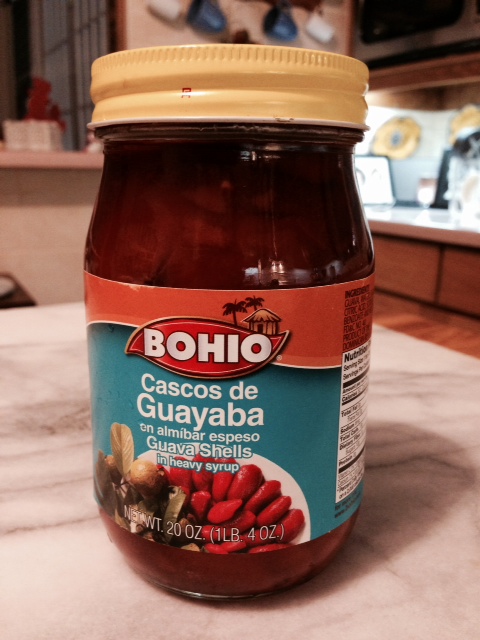
guavas

all mashed up

Spicy Hibiscus and Guava Jam

  • 2 cups dried hibiscus flowers
  • 3 cups water
  • 1 – 2 cups sugar (I used 1 1/3 cups)
  • ¼ – ½ cup minced ginger
  • 4 hot peppers, halved (I think mine were scotch bonnets – handle carefully to avoid a burn!)
  • 1 ¼ cup chopped guava (20 oz. jar, drained)
  • ¼ cup lime juice
  • 1 box Pomona’s Universal Pectin (mix calcium water according to directions and use 4 teaspoons calcium water and 1 tablespoon pectin; there will be enough of the package left over for two or three other recipes)

Before you start, prepare jars and lids by washing and sterilizing in boiling water (number depends on the jar size; the recipe will yield about 3 ¾ cups).  Mix the calcium water according to package directions, ½ teaspoon calcium powder in ½ cup water, and mix 1 tablespoon of the pectin powder with ½ cup of the sugar.

Put the dried flowers and water in a saucepan and bring to a boil.  Reduce heat to simmer, covered, for 20 minutes or so, then scoop out the flowers with a slotted spoon. Add the minced ginger and halved peppers and simmer gently for another 20 minutes or until the liquid tastes as spicy as you would like.  Strain through several layers of cheesecloth, rinse the saucepan and pour the liquid back into it (except for the little bit of sediment that will settle out).  Stir the lime juice, chopped guavas, 4 teaspoons calcium water, and the ½ cup sugar mixed with 1 tablespoon pectin into the hibiscus liquid and bring to the simmering point again, stirring to dissolve pectin.  Taste and add additional sugar until the mixture is at the desired sweetness, then bring to a full boil and cook for two minutes.  The jam will still be rather saucy, but it will thicken when it cools.

Pour jam into hot jars, seal, and process in boiling-water bath for 10 minutes.  Remove from canner and allow to cool completely before checking seals.  The jam is a nice deep claret color. Add a glittery ribbon or bow, and these are ready to hand out for Christmas.

close up

jam outside

Tami

Tagged , , ,

Nostalgic apricots

The other day, as we were cleaning up from the farmers’ market, I got a little too enthusiastic about the apricots. Maybe I brought home one pint, maybe I brought home three; it doesn’t matter – there were just too many to handle. You see, back on the farm, we used to have an apricot tree. It was my second favorite tree in our yard, the first being a maple tree whose branches and limbs had conveniently grown into a seat-like structure, perfect for little Kara to climb up with her books.

and evidence I had bangs before they were cool.

The apricot tree, though, well, let me tell you: the apricot tree had a little swing dangling from one of its branches. The apricot tree had a lot of leaves, which come fall time, could be easily swept with all the other leaves into the perfect jumping pile.

apricot leaves

The apricot tree was the tree we used to make homemade ice cream, by filling a few grocery bags with ice and salt and placing our ice cream concoction in a resealable bag nestled inside the ice, slinging the whole thing over a branch, and pushing it back and forth. (Science!) Most importantly, the apricot tree had apricots. Sometimes they were a little spotty, sometimes wormy, but those apricots will always be my favorite.

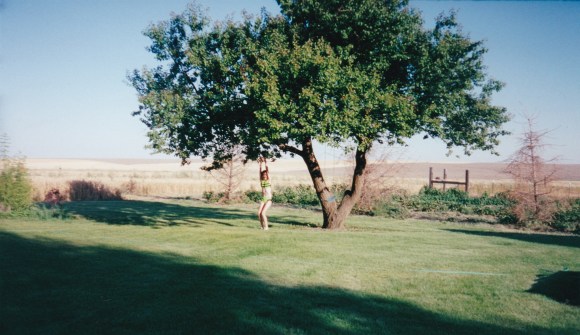
apricot tree in the summer

You might be able to understand, then, why I became so enthusiastic about the apricots at market. I wanted something simple to preserve them a little longer and looked no further than the Russians. (I knew they would have something for me.) One of my favorite things about living in Russia was tea time, which was basically all the time. When you have tea, you must have a cookie or something sweet. And if you have tea and cookies, you should probably also have a little dish of homemade jam and use its syrup to sweeten your tea. Or you should just eat the jam with a spoon. And if you eat the jam with a spoon, you might quickly eat a whole jar. If you eat a whole jar, you’ll likely clamor for the recipe, and even if you get the recipe, and even if what you make is pretty decent, the magic of that jam in that tea with those cookies might always be lost. (This, I am sure, is what would have happened if the mouse had been given tea and jam with his cookie.) All will not be lost, though, because one day, when you least expect it, you’ll come across a recipe that you know is just the one for which you were always searching.

apricot blueberry preserves

Apricot and Blueberry Preserves
adapted, barely, from here

Note: After I had prepared my apricots and blueberries, I discovered I was out of white sugar. Not to be outwitted again by the elusive Russian preserve, I improvised and used a combination of maple syrup and brown sugar, whose roots, I feel, are decidedly North American. Maybe I should call these Americanized Russian Preserves. Try it either way.

  • 3/4 pound apricots, halved and stones removed (don’t bother peeling, unless you’re feeling ambitious)
  • 1/4 pound blueberries, rinsed and removed of renegade stems
  • 1 cup brown sugar + 1/2 cup maple syrup
  • 2 to 2 1/2 cups water
  • 1 tablespoon lemon juice

1. Combine sugar, maple syrup, and two cups of water in a pot and heat over medium-high until sugar dissolves. Add apricots and blueberries.

2. Bring mixture to a boil, then lower to a simmer and keep simmering for about 50 minutes, stirring occasionally. Taste as you go along, and add more maple syrup if you think you’d like it sweeter. To test for doneness, spoon a bit of syrup onto a small plate or bowl and place in the freezer for a few minutes. Take out of the freezer and run your finger through the syrup – if it leaves a clear line, it’s done. You can also stop cooking earlier if you want a thinner syrup. If you overcook or the mixture seems like it needs more liquid, add more water until it’s at your desired consistency. Just remember the preserves will thicken a bit as they cool, so don’t be worried if they seem a little thin while still hot.

3. When done cooking, transfer preserves to a jar. You’re supposed to allow this to cool to room temperature before placing it in the refrigerator, but it was late and I was sleepy so I just put them right on in. As far as I can tell, it didn’t make a difference.

Yield: about a pint

The preserves will keep for quite a while (a month or two) in the refrigerator. You could also freeze them to make them last forever (…or at least, a year or two). I like these preserves with unsweetened tea, next to lemon bars, on top of granola and yogurt, or with a spoon.

Kara

I don’t have trees to climb any more, but I do have a roof with a pretty alright view.

Tagged , , , ,

Peach butter barbecue sauce – Part 1

I promised you a recipe for peach butter barbecue sauce, so here I am. But. You will have to be patient, because this recipe is part of a two-part series. Today, you get the main component – Spicy Peach Butter.

Also, sunflower.

The spicy peach butter is loosely adapted from Smitten Kitchen’s Peach Butter. (Side note: I’ve made, like, a ton of things from Smitten Kitchen’s archives lately. Bordering on obsession over here.) In addition to being an ingredient in my soon-to-be-developed peach butter barbecue sauce, the spicy peach butter is (shocker) very good friends with cream cheese on toast. (I’ve found cream cheese on toast has quite a few friends, actually – jams, chutneys, candied jalapenos, need I say more?)

The proportions below yield about 3 cups of butter, so adjust accordingly. I didn’t can it and will attempt freezing the unused portion, although if you are so inclined, can away. Also: I’m guessing I used about 1/2 teaspoon per spice, resulting in a pleasantly spicy butter. If you don’t want spicy fruit, I won’t be that offended if you make it without.

In sum, give this peach butter a shot. Even if you’re not a fan of barbecue sauce (although why wouldn’t you be?), make the spicy peach butter for the cream cheese. It’s also great on crackers with a slice of gouda. Now that I think about it, it could almost definitely be used to baste some chicken in an oven or on a grill. Oh! Or in a sandwich with some leftover roast pork. Really, you have nothing to lose here.

Spicy Peach Butter
adapted from Smitten Kitchen’s Peach Butter

  • 2 lbs peaches, skins removed* (5-6 medium-sized peaches)
  • 1/2 cup water
  • 1 cup sugar
  • 1 – 2 tablespoons honey
  • freshly cracked pepper, crushed red pepper, cayenne pepper to taste (I used roughly 1/2 teaspoon of each)
  • juice of one lemon

Halve the peaches and remove the pits. Roughly chop peaches. Place peach chunks and water in a large pot and bring to a boil. Simmer until peaches are tender, about 15 to 20 minutes, stirring occasionally to ensure they cook evenly.  Depending on desired chunky-ness, you could mash the peaches with the back of a fork, a potato masher, or blend them in a food processor, blender, or immersion blender. My peaches became quite mushy and I didn’t find it necessary to blend them, but if you like a smooth butter, go for it.

Peaches in pot, pre-butter consistency

Peach butter. Boom.

Add the sugar, honey, spices, and lemon juice to the peaches and bring the mixture to a strong simmer/gentle boil, cooking for 30 to 40 minutes. Stir occasionally in the beginning and more constantly as it thickens to prevent scorching.

To test for doneness, I like to scrape a spoon across the bottom of the pan – if it leaves a clear line with the bottom of the pan visible, it’s done. Or, you can drizzle some butter across the surface, and if the drizzle holds its shape before melting back into the pot, it’s done. And honestly, you can basically tell just by looking at it; while it does set up some amount as it cools, the butter should be a “buttery” consistency when it’s ready.

Let peach butter cool, and store in an airtight container in the refrigerator for at least two weeks (mine is going on three, and it’s still fine. Peachy, even.)

If you plan to can, I refer to the original recipe:
“To can your peach butter: First, sterilize your jars, either by boiling them in a large, deep pot of water (which should cover the jars completely) for 10 minutes or washing them in lots of hot soapy water, rinsing and drying the parts well and then place the jars only in a 200 degree oven for 20 minutes. Then, divide your hot piping hot peach butter between your jars, leaving a little room at the top. Wipe the rims clean with a dry towel and cover the jars with their lids. Submerge the jars in a large, deep pot of boiling water for 10 minutes, either in a removable basket or using tongs to dip and remove them. Let cool completely on towels, a process that can take overnight. If canned properly, the peach butter should last indefinitely at room temperature.”

It’s also really good on cheese, on a cracker. Really, really.

*You have a few options for removing peach skins. 1) Bring a pot of water to a boil, slash an X in the peach bottoms, place peaches in water for about 30 seconds, then remove and place into a pot of cold water until cool enough to touch. The skins will slip right off. Or, 2) Freeze peaches, and then the skins just sort of rub off when you take them out. Or, 3) My peaches were so ripe that the skins just slipped right off. I’ve never had this happen before, but hey, whatever works.

Kara

Tagged , , ,

Varenye iz yablok (Russian Apple Preserves)

Please don’t get mad, but this is one recipe I just have to tell you about. It is, again, about apples – Russian apples this time.

When I was studying in Moscow during my third year of college, I would frequently visit Kelly and Phil at their host family’s beautiful apartment. This apartment is in one of my favorite spots in Moscow: by the Moskva Reka, or Moscow River. The apartment was steps away from a few of the most central metro stops and home to a cautious black lab named Roma. The family’s little grandson would sometimes be over, playing on his toy truck and chattering with Kelly or Phil in squeaky, baby Russian. Foreign languages are so much cuter when they come from little kids.

The apartment was exactly what I imagined all Muscovite apartments to be: classy. The wallpaper felt old, the floors were made of a creaky wood, hundreds of Russian books lined the bookshelves, and one of Moscow’s Seven Sisters  could be seen from the window in the long, narrow kitchen. And, more importantly, there was plenty of tea, bread, cheese, and homemade jam to be had – always crowded around the little kitchen table, often while playing a game of chess.

Homemade preserves are my favorite, and Russian ones are especially good. The two most memorable came from the apartment by the river, and I will forever crave them. One was made from a Siberian berry that I’m pretty sure is called the oblepikha, or Sea Buckthorn in English. The preserve had the most unusual taste, a little tart and very distinct. I loved it.

The other preserve was made from little crab apples, and always sat in a bowl on the kitchen table, just waiting to be gobbled up with tea. Luckily, Kelly got a copy of the recipe for the apple preserves so we could make it ourselves. There is only one tiny problem.

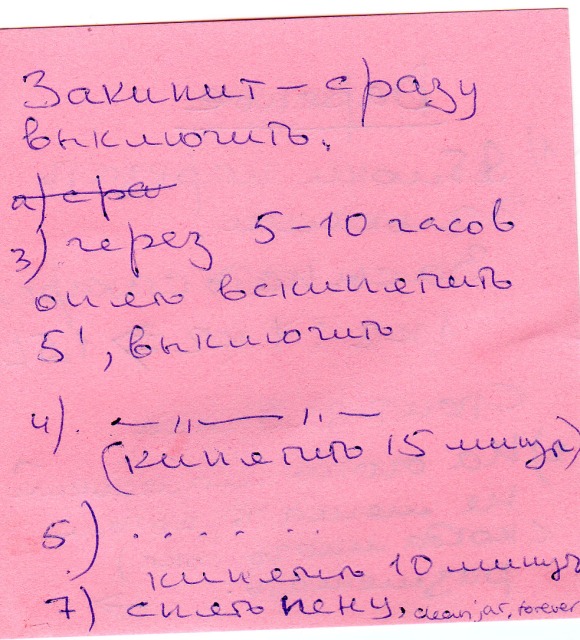
Translating recipes from quickly scribbled Russian is hard.

But, not to be outsmarted by my own major, I decided to tackle the recipe and make those preserves even if it proved to be the end of me. Sure I could phone a Russian friend and ask them to help me out, but I wanted to do it myself. So dramatic, so Russian.

For a recipe that I’m pretty sure only has two ingredients, apples and sugar, and six or seven steps (the sixth is mysteriously missing…whatever, it’s Russian), I had quite the time translating this. I’m admittedly not the best at reading handwritten Russian cursive, but with a handy little online dictionary I could type in what I thought the words were until something that made sense came up. This, of course, brought a few interesting results – mistaking “segments” for body parts, “add” for the verb meaning to fall asleep, and coming up with “shine, beam, to be resplendent” and “action, suit” for the last instructions.  All that plus the seemingly random ratio of numbers in the first step (which I still don’t understand, but we’re just going to ignore that) made me more than a little nervous to try this recipe. (Edit: it’s most likely the ratio of sugar to apples, resulting in more than 1.5 liters of preserves)

I couldn’t just ignore the recipe, though. After all, if it didn’t turn out, it would at least make an entertaining blog post.

And so, dear friends, this is what I translated:

Varenye (Preserves)

  1. Cut the apples into segments, cover with sugar. 1 kg : 1 kg -> 1.5 L
    Let sit 3 hours.
  2. Heat on low heat without mixing, then when there is a lot of juice mix it all together. When it starts to boil, take it off the heat right away.
  3. After 5 – 10 hours bring to a boil again for 5 minutes.
  4. After another 5 – 10 hours, bring to a boil for 15 minutes.
  5. ………
  6. Boil for 10 minutes
    (No idea what this says, but it’s presumably something to do with storing the preserves.) Edit: Carrie informed me that it says спечь пену, which means “skim the foam” that forms on top of the preserves. Thanks, Carrie!

I’ve kept you in suspense, I know. Are my varenye what I’ve been missing for almost two years now?

First things first: I don’t have the right kind of apple to make the apple preserves. The apples the Apartment by the River used looked more like this, resulting in one-bite-able apple preserves that looked almost exactly like this. I only had Granny Smith apples and a bunch of larger crab apples from Braeden’s parents’ neighbor’s tree. So, they aren’t exactly the same. But my dears, they are pretty darn close. More importantly, they are pretty damn good.

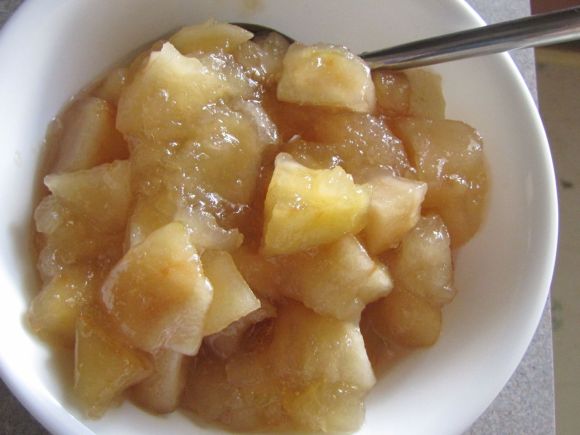
I experimented with two Granny Smith apples first, peeling and cutting them into chunks, covering them in a lot (probably 1 or so cups) of turbinado sugar, and then following the “let sit three hours – boil – rest – boil – rest – boil – rest – boil – done” technique. And, it worked! They’re really good. Sweet but still somehow tart, soft chunks of apples. Perfect for tea time and chess.

Now. I had all intentions to try the crab apples next, but, well, by the time I got around to it, they were looking pretty rough. They had already been outside when it frosted (and snowed!) and looked a little sad. Instead of using the crab apples, I used the remainder of my Granny Smiths, but changed the method a tiny bit. After investigating a recipe for Crab Apple Preserves on a popular Russian cooking site, I decided to add a little water to make the varenye more syrupy like I remembered from Russia. This syrup, by the way, is excellent added to black tea. Oh, and Russians also add jams to their tea. It is unsurprisingly really good.

Varenye iz yablok

  • 3 Granny Smith apples, peeled, cored, and cut into large cubes
  • 2/3 cup sugar (I found that cane sugar results in more syrup, while turbinado results in more jell. Or maybe the pectin was different in the apples?)
  • 1/2 cup water

Place the apples in a medium sized bowl with the sugar, and stir to coat. Let sit for 3 hours.

Pour apples in their juices and water into a medium sized saucepan and bring just to a boil over low heat. You’ll hear the juices start sizzling, and see little bubbles rise to the surface. Take off the heat at this point (don’t let it boil), cover, and let sit for 5 – 10 hours.

Uncover, heat again on low heat, and this time boil for 5 minutes. Remove from heat, cover, and let sit another 5 – 10 hours.

Again – uncover, bring to boil for 15 minutes, cover, and let sit. And one more time, cover and let sit for up to 10 hours, then boil for 10 more minutes (I added a little more water at this point), and then you’re done. Store in the refrigerator, and pull them out to have with cheese and bread and tea.

Yield – about two cups. The preserves should last quite a while because of all the sugar, but mine didn’t last that long because they were eaten.

These preserves still didn’t get as syrupy as I wanted, and a lot of the chunks also turned mushy. This, according to Matt, is because of the type of apple. He also says I could use a different apple variety and use less sugar, making the preserves more healthy and even better tasting. …what? Do something differently than how the Russians do it?! Unheard of. Absurd! But, after a little arguing, he convinced me to try it with different apples. I hope to be back soon with a report of success. Fingers crossed.

Thanks to Kelly for the lovely chess-playing picture. Как я скучаю!

~

And, since writing this post made me all sorts of nostalgic, here are a few pictures from Russia – just so you can glimpse it yourself. These are more pictures from the Apartment by the River, during a birthday party for Jon. I hope you enjoy them as much as I do.


Kara

Tagged , , , ,

Please, sir, I want some more [apples]

This is going to be another post about apples, but since Mom gave you Pan de Muertos and a unique yogurt syrup recipe and Janessa gave you shredded pork chili and an Irish coffee recipe, I hope you won’t mind.

By the way, this is what happens when your boyfriend finds a spider in the bottom of a shopping bag, and then proceeds to kill said spider with apples. I couldn't make this up if I tried.

I sometimes have this little problem: I will be sleeping soundly, when all of a sudden my stomach wakes me up and demands that it be fed. Once when I was about eight, I had long gone to bed when my dad decided to make some popcorn at 11 at night. Bad idea, Dad. The smell wafted down the hall into my room, waking me up and causing my cloudy-from-sleep brain to think the clock said 11 in the morning.  I leapt from the bed and ran down the hall, freaking out at my parents for letting me sleep in and miss school. (No matter that if it were actually 11 in the morning, my parents would be at work and would not be making popcorn. And it wouldn’t be pitch dark outside. …I also have this weird zombie/sleepy haze thing going on sometimes.) On the bright side, I was able to munch on some popcorn and then return to sleep, happy and content that I would not be missing school.  (I also had this nerdy thing going on. Yes, had.)

Now that I’m all grown up (ish), the problem has worsened. Sometimes I wake up at 4 or 5 in the morning, inexplicably starving, and then for the life of me can’t fall back asleep. You see, once I realize I’m hungry, I start thinking of what I have in the kitchen to eat. This reminds me that we still have a lot of food in the freezer and pantry that needs to be consumed, somehow!, before we move to Washington, D.C. And then that gets me all nervous about my job and internship search, thinking of all the things I can do and all the things I know and all that education I have and how, thus far, I got nothin’. All of this makes me wonder if I should add a post script in my cover letters, stating something like “By the way, I make delicious baked goods and will bring them in to the office at least once a week. Hire me. Please.” In sum, if you give this mouse a cookie, she’ll go insane.

Until now. I no longer have to zombie downstairs with droopy sleep-eyes and rummage through the fridge mumbling “Just a biiite.” I found this recipe a while back for Apple and Oat Drops, and knew they would be just the little bite I would need to satiate my tummy, for at least a few hours. They have that great flavor of baked oatmeal but in a little, incredibly moist morsel. And, with no added sugar and just a tablespoon of oil, they’re actually good for you. They’re also vegan; if you’d like to make them gluten free, I think just making sure your oats are gluten free, substituting the wheat flour for almond flour, and not using the wheat bran would do the trick.

Apple and oat bites, adapted from this

  • 1 1/2 cups rolled oats
  • 1 tablespoon whole wheat flour
  • 1/4 cup wheat bran (optional – I really just added it because it was taking up pantry space)
  • 2 large apples (I used Granny Smith), coarsely grated
  • 1 tablespoon mildly flavored (aka not Olive) oil
  • 1/2 teaspoon vanilla extract
  • a pinch of salt
  • 5 tablespoons hot water
  • 1/2 cup dried fruit (I used a mixture of chopped dates and dried cranberries)
  • 3 tablespoons chopped nuts, such as walnuts, pecans, or almonds

Preheat oven to 350 F. In a medium sized bowl, mix together everything but the dried fruit and nuts. Mix in the fruit and nuts (it’s easiest if you use your hands). Let mixture sit for 15 minutes.
Line a baking sheet with parchment paper. Drop the batter onto the sheet in big tablespoon-sized plops. You can place them close together, just not touching, as they won’t spread during baking.
Bake in the middle of the oven for 15 minutes, until light golden brown.
Let the bites cool on the pan – they are fairly delicate, so let them sit on the pan or they might fall apart. Store in an airtight container for, um, a week or so.

This recipe only used two apples and I still have a lot to go through, so I decided to also make a small batch of applesauce – the sweet kind this time. After looking through a few applesauce recipes I decided I knew what I was doing and started peeling and chopping away. A few recipes I found snuck some ginger into the sauce, and since I have half a knob of ginger just chillin’ in my freezer, I threw some of that in too. Instead of using water as a cooking liquid, I used fresh apple cider. Just to continue with the experimenting, I also dashed a little cayenne in – just enough to make you think. Going back to the traditional, I threw in some cinnamon, cloves, and a little raw cane sugar for good measure.

Oh it is good.

Gingered applesauce

  • 5 medium apples – I used 4 Granny Smith and then 2 small mystery apples
  • 1 – 2 tablespoons finely minced (or grated) ginger
  • 1 cinnamon stick, snapped in half (more if you want more cinnamon flavor)
  • 4 or 5 whole cloves, bundled in cheesecloth or a coffee filter
  • a few dashes of cayenne (optional)
  • 4 to 5 tablespoons raw cane sugar, or to taste
  • dash of salt
  • 1/2 to 1 cup fresh apple cider, or water

If you are the proud owner of a food mill or this, you don’t need to peel or core the apples; just roughly chopped will do. If you would like a food mill for Christmas but it’s still October, peel and core the apples, then roughly chop.

Place everything except the cloves bundle into a large pot or sauce pan and stir to mix. Put the clove bundle in, and be careful not to let the cloves fall out (or, tie the bundle with some kitchen string and be carefree). Cook over medium heat, stirring fairly often, until the apple are quite soft and falling apart, about 20 – 30 minutes. If all the liquid evaporates or things start to stick, add more cider or water. Take out the cinnamon sticks and clove bundle. Depending on your desired consistency, either mash everything with a potato masher, or blend with an immersion blender or other blender. Taste and add more sugar or spices to your liking. Let cool and place in an airtight container. Keeps for a week, or probably longer.

Kara

Tagged , ,

Fruit, Glorious Fruit: Wine Grape Jam with Ginger

This project started when I stopped at the produce store for a few things, and as I was checking out, the saleswoman asked if I wanted some of the grapes she had sitting by the register for a euro a bag.  I asked if they had seeds and she said yes, so I said no, thanks.

So yeah, I’m greatly exaggerating my communicative ability – she said a whole bunch of words I didn’t understand but I did catch “Trauben” and “ein Euro,” and it helped that she was also gesturing toward the bags of grapes, and then I wracked my brain for the word for seeds, remembered that pumpkin seed bread is Kürbiskernbrot, and came up with “ummmmm, Kerne?” with a questioning sort of inflection, and at her “ja,” responded, “nein, danke.”

I was putting my purchases in the car when I remembered the half-empty jar of delicious Ginger Grape Jelly that Kara sent us from Reid’s Orchard in PA.  Why not try to make my own?  I went back in the store and asked the lady if the grapes would be good for jam.  Yes, exaggerating again, although at least I knew the word “Konfitüre” from buying jam in the grocery store – but she knew what I meant and nodded, “genau, ja, ja” and we were in business.

I had never made grape jam before, so once I got home, I turned to the trusty Farm Journal Home Freezing and Canning book that my mother-in-law gave me back in the late 70s.  The grape preserving recipes all said to slip the skins, but the skin on these grapes just wouldn’t slip off.  I went online to research further and that’s when I learned that the American Concord-type grape traditionally used for jam and jelly is a “slip-skin” grape, and I obviously had some kind of European “tight-skin” wine grapes.  Hmmmm.  This called for more research.

The method I settled on to extract the goodness from the grapes is described in greater detail in this Grape Preserves recipe.  Although the Reid’s Orchard jelly is really good, I like a little more body in my fruit spreads, so I decided to include grape pulp as well as juice.

First, I mashed the grapes with a potato masher.  I started out putting a layer of grapes in the bottom of a shallow plastic container but quickly realized the juice was going to squirt out all over the place so I swapped it out for a deeper container, and that helped contain some of the spray.  I stemmed a bunch at a time, squashed them with the masher, and dumped them into a big heavy stainless steel pot (the same one that serves as my make-shift canner).  The whole grape-squashing process reminded me of the scene in A Walk in the Clouds after the harvest, when the girls jump in a giant wooden vat to stomp the grapes to a pulp, and I bet it must have been a really fun scene to shoot.  I settled for humming the sound track as my grapes popped under the potato masher, and it was a strangely satisfying little task that yielded a surprising quantity of juice.

After all the grapes were mashed, I brought them to a boil, stirring once in a while, and let them simmer for 15 minutes.  By this time they smelled fabulous and the juice had turned a beautiful deep plummy-purple.  There was probably a gallon of mashed grapes and juice.  I let it cool and then used a food mill with the fine screen inserted to separate the seeds and skins from the good stuff.  A few seeds snuck through the mesh, but I fished them out when I was transferring the juice/pulp to my jam cooking pot.  If you don’t have a food mill you can use a wire sieve lined with cheesecloth and push the grape pulp through with a glass or small round bowl.  I ended up with 2 ½ quarts of thick dark purple juice.  I used 7 cups for this jam and put the other 3 cups in the freezer for another time.

My husband thought he would like a stronger ginger flavor than the Reid’s version, so I decided to use all the ginger I had (probably not quite ¼ pound).  From my reading I thought it would be a good idea to use commercial pectin, and I had Sure Jell brand.  Well, I’m normally an instructions-reader, but for some reason, although I’ve only made French-style long-cook jams and jellies with no added pectin until now, I thought I knew what I was doing.  I mixed the package of pectin into the sugar and stirred it into a roughly equal quantity (by volume) of the grape-ginger blend.  Then I looked at the instructions and learned I should have mixed the pectin into the juice and brought it to a full boil before adding the sugar.  At that point I figured, what the heck? and kept on jammin’, and the result is perfect – a very intense grape and ginger flavor with a spreadable but not runny consistency.  I ended up with four big jars and four small ones, and I think this jam will taste great with brie or slathered on fresh hot corn bread. Here’s how to make it:

First, get the jars and lids ready.  Of course, they need to be clean and hot; an easy method is to put the jars in a water-bath canner and boil them for a while.  I also recommend processing jam in a boiling water bath for five minutes.  I know some people skip this step and depend on the heat from the jam mixture to seal the jars, but I think if you are going to this much effort, it is better to go a step further to ensure that you can safely store the finished product on the pantry shelf (for more info, see all the tips from the National Center for Home Food Preservation at UGA, including recommended adjustments to processing time for higher altitudes).  I don’t have a real canner, but any big pot with a lid will work, just so it is deep enough that you can cover the jars with boiling water.  You can put a folded towel in the bottom if you don’t have a rack that will fit inside.

Gingery Grape Jam

  • 7 cups grape juice/puree mixture (see explanation above – it is really more of a thick juice than a puree)
  • 2/3 cup lemon juice (bottled juice is fine for this)
  • A big chunk of ginger, peeled and thinly sliced or finely grated (I had about 2/3 cup when the slices were pressed down into a cup; it made a very gingery jam, so use less if you want a milder ginger flavor)
  • 7 cups sugar
  • 1 package Sure Jell Pectin (I’m sure any brand will work, but the jam recipes I found online seemed to vary the quantity of fruit somewhat, depending on the pectin brand)

Put the grape puree into a large pot – I would go with stainless steel rather than aluminum, and the one I used will hold 6 quarts.  Place the ginger slices in a blender with the lemon juice and a cup of the grape juice and process until the ginger is chopped into tiny little particles, or you can grate the ginger instead (we’re all about power tools around here).  Pour the ginger/juice into the jam pot.  Measure the sugar into a separate bowl, stir in the pectin, then stir the sugar mixture into the fruit (I don’t recommend simply measuring the sugar straight into the fruit cup by cup, because it is too easy to lose count).

Stir over medium heat until the sugar is completely dissolved, then you can increase the heat some and stir occasionally until it comes to a full rolling boil that you cannot stir down.  While the juice mixture is heating, get the water going for the boiling water bath.

The pectin package recipe says to boil the fruit mixture exactly one minute, and the Grape Preserve recipe I found says exactly two minutes, but I probably let it boil hard for 3-4 minutes.  I don’t have a reason based on deep insights into kitchen chemistry and physics, but it just seemed right, and it worked.

Carefully ladle the mixture into hot jars, leaving about ½ inch head space at the top of the jar (I bought a jar funnel this summer and it greatly simplified jar-filling).  Wipe the jar rims with a damp paper towel and tighten the lids, using a folded paper towel to protect your hand from the hot jar.  Carefully lower the jars into the boiling water, cover, and process for 5 minutes – a jar lifter is another really handy little tool.  At the end of the processing time, set the jars on a folded towel to cool, and soon you will hear that rewarding pop, pop, pop of the jars sealing.

Yield: four 230 ml. (approximately ½ pint) and four 440 ml. (not quite a pint) jars, plus another cup or so that I poured directly into a little jelly bowl and refrigerated.

One last tip – if you live in a hard-water area like I do, the jars might be covered with mineral deposits.  After the water in the canner cools, pour in a half-cup or so of any kind of cheap vinegar and dip the jars in for a minute.  Rinse and dry, and they will be nice and clear.

Tami

Tagged , , ,